BoredomBusted — Find Your Next Favorite Thing To Do
Discover hobbies, activities, places, and ideas that spark joy. Whether you're looking for something creative, active, social, or relaxing, BoredomBusted helps you find your next favorite thing to do.
Browse our hobby guides, things-to-do collections, and place ideas to never be bored again.
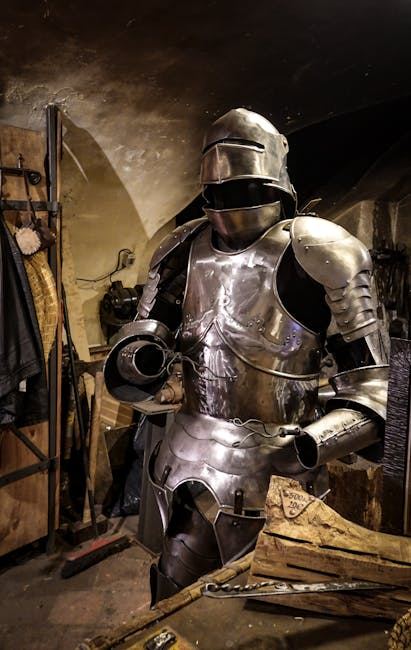
Armor making isn't just medieval fun—it's a rigorous engineering exercise where even a simple gorget teaches you advanced metalworking principles.
Learning armor making as a beginner involves transforming flat metal sheets into custom wearable protective gear through the use of various tools. You start with mild steel or aluminum and shape it by hand into something a human body can actually wear.
There are no kits. No pre-cut parts to assemble. Every curve you see in a finished piece was forced into flat metal one hammer strike at a time.
That shaping process is called raising or dishing, and it's the core skill beginners spend the most time on. Getting it wrong means your breastplate doesn't fit a real torso — so the human body is your template, not a plan on paper.
In armor making, you either follow patterns to cut and shape materials like steel or leather, or use sculptural techniques to forge armor pieces directly, requiring skills like raising, riveting, and leatherworking to create intricate, functional items.
This hobby engages your mind through tangible skill progression and creative problem-solving, as you interpret historical designs while mastering techniques, leading to a deep sense of accomplishment and satisfaction from creating unique pieces.
You think armor making is a medieval novelty. Adults in garages pounding metal into knightly shapes — entertaining, maybe, but not a real skill.
That assumption misses what the material actually teaches you. Every curve you hammer and every rivet you set is a lesson in force, tension, and metal behavior. Armor pulls together metalworking, leatherworking, historical research, and pattern drafting — and a binding pauldron is an engineering problem, not an artistic preference.
A hobbyist in Ohio started with a gorget — just a collar piece, nothing elaborate. Six weeks of fixing splitting edges later, she had worked out metal grain direction, annealing, and the same structural solutions medieval armorers were using in the 1400s — not because she researched them in advance, but because the metal forced her there.
One problem.
One collar piece.
Six weeks of compounding knowledge that no tutorial would have handed her in sequence.
The good news is you don't need a forge or a large budget to get to that same point — just the right starting gear.
Turning a flat sheet of steel into a breastplate looks elegant from afar. When you sit down to try, your hands feel awkward and unsure.
The gap between watching and doing is not skill but expectation — everyone's first day is a struggle. Expect tools you don't recognize and metal that seems to fight back. Hammering feels aimless, and measurements never quite align.
Measuring and questioning will take more time than shaping. By week one, prepare to pause often and double-check. As your edges sharpen into week two, quality gloves aren't optional — your hands will tell the difference.
Steel becomes stubborn if overworked. Beginners read that resistance as failure — it's actually a signal to stop and reheat.
By week three, your piece will probably look nothing like the videos. That gap is not a setback — it's proof you made something instead of just watching someone else do it. Everyone has an ugly first creation. The next section covers the mistakes that keep people stuck in that frustrating phase longer than they need to be.
When to start: Morning
Duration: 1 hour
Cost to try: $30
Success criteria: if you finished without injuring yourself, do session 2.
Steel and aluminum are unforgiving. One wrong cut wastes expensive material.
Beginners focus on shape and forget that armor has to flex with a moving body. Elbows bend. Shoulders rotate. A chest piece that looks perfect flat on a table can lock you up the moment you reach forward.
Before cutting any metal, sketch your articulation points — elbows, shoulders, knees — and physically test the range of motion in your cardboard mockup. Problems caught at the template stage cost you nothing. Problems caught in steel cost you hours.
16-gauge steel feels like the authentic choice — and it is what historical armorers used. But without an angle grinder, a hardy tool, or serious upper-body endurance, you'll spend twice as long on every curve and risk stress injuries before you finish a single pauldron.
Start with 18-gauge mild steel or aluminum. Both shape more easily with basic tools, and the skills transfer directly once you're ready to move up in gauge.
Raw cut edges are genuinely dangerous — they'll slice through gloves and snag on straps and liners. Most beginners plan to finish edges later, then run out of motivation once the piece looks "done."
Bevel every edge by filing and sanding before you do any shaping or assembly. Once rivets and straps are in place, access to inner edges becomes nearly impossible — so finishing them first is the only practical window you have.
Cold metal resists and sometimes warps unevenly when hammered.
Heat steel to a dull red and let it air cool to make shaping easier.
Armor making happens at home workshops, local makerspaces, and renaissance fair grounds – see makerspace and renaissance faire for venue breakdowns.
Most serious work gets done in a personal garage or shed once you're past the beginner stage, but starting somewhere communal saves you from buying tools you'll never use again.
The Society for Creative Anachronism functions as the closest thing to a national governing body for functional armor making in the US – they also run combat-legal standards that define what "finished" actually means.
Walk in and say: "I want to learn to make armor and I don't own a single tool yet."
That exact admission gets you a mentor who skips the sales pitch, hands you a hammer, and lets you try before you commit to anything.
Medieval, Roman, and Japanese armor have centuries of documentation behind them — and historical armorers will check your work. You're cross-referencing museum pieces, period manuscripts, and metallurgical records before you cut a single piece of metal.
This path suits people who find the research as satisfying as the build. Patience and deep curiosity matter far more here than speed or raw skill.
Foam and Worbla are the materials here. They're cheap, easy to cut, and mistakes disappear with a heat gun. You're chasing a look, not a load-bearing structure — and that tradeoff opens the door to impressive results within a single weekend.
The lowest barrier to a finished, wearable piece — which makes this the natural starting point if you've never built armor before.
SCA and buhurt armor absorbs real impacts from real weapons. That means steel grade, thickness, and joint tolerances aren't aesthetic choices — they're safety requirements that marshals and event organizers will inspect before you're cleared to fight.
Material costs run high and the standards are unforgiving. But armor you've built yourself and fought in carries a different kind of satisfaction than anything you could buy.
Maille is hundreds — sometimes thousands — of individually linked rings, assembled by hand with pliers. There's almost no metal shaping involved. The complexity lives entirely in the pattern and the repetition.
If you find rhythm in repetitive, methodical work, this is the only armor style that actually rewards that instinct — and the finished texture is unlike anything else.
Cosplay and prop armor starts from a reference image, not a historical template. The silhouette, color, and character read matter more than structural logic. You might combine foam, resin, 3D-printed parts, and paint to nail a specific look from a game or film.
The constraint is the character — and having a fixed visual target to hit actually makes creative decisions easier, not harder.
If you want a related angle, Segmented Turning is the natural next stop.
For something adjacent, see Textile Crafts.
Sculpture lives in the same world — different mechanics, similar appeal.
Reading body geometry is the skill that sets serious crafters apart. It means transforming curved, three-dimensional forms into flat templates you can actually cut.
Understanding the why behind pattern shapes matters more than just cutting patterns. A pauldron's convex flare or a breastplate's curve aren't aesthetic choices — they're geometry solving a body's shape.
Translate body curves into flat geometry and your armor will fit properly every time. Cutting corners here leads to endless strap adjustments on pieces that never quite sit right.
Start with the tape-and-peel method before you touch real material. Wrap a limb or torso section in painter's tape, draw your segment lines, cut it off, and flatten it. That collapsed shape is your pattern geometry — pulled directly from the body.
From there, train your eye on historical pieces. Pull a museum-quality reference image of one armor piece and sketch how its curves would flatten. Mark where darts, overlaps, or flares have to go — this is how you stop guessing and start reading.
Finally, make every new piece twice. Build it in cardstock first, wear it, move in it, and mark anything that pulls, gaps, or rotates. Fix it on paper, then cut the real material. The next section covers which materials reward this process most.
Four sessions over 30 days is your test. One session a week — enough to struggle, adapt, and start seeing what this hobby actually asks of you.
Armor making demands patience and adaptation from day one. You're not just experimenting with tools — you're discovering metal, templates, and rivets while testing your own nerves simultaneously.
If pieces of your project are haunting your thoughts between sessions, that's the pull. Your mind won't drop it — not because the sessions were fun, but because the problem isn't solved yet. Join a workshop and buy your first sheet of metal before the next session.
Indifference after four sessions is honest data. The dream of armor making is often more vivid than the work itself, and four sessions is long enough to know the difference.
If the sessions felt like a drain, don't reframe it. The physical grind and the gap between expectation and result don't shrink with time — they just become more familiar.
The sign you can't reason your way into: you're pausing movies to study how armor pieces connect, or crouching toward a museum display to check a rivet seam. That's not casual curiosity — that's the hobby already running in the background.
If nothing here clicks, our guide to what to do when bored covers shorter, lower-commitment options.
Beginner armor-making projects can start for $100–$300 with basic leather tools and materials, while metalworking setups range from $500–$2,000+ depending on equipment quality. Many hobbyists begin with leather before investing in a full metal shop, allowing them to learn techniques affordably first.
For leather armor, you'll need cutting tools, edge bevelers, stamps, and hardware like rivets and buckles. For metalwork, essential equipment includes an anvil, hammer, tongs, metal stock, and safety gear like gloves and eye protection. Both paths benefit from a dedicated work space and reference materials on historical armor construction.
A simple leather bracер or vambrace typically takes 10–20 hours, while a full metal chest plate can take 40–100+ hours depending on complexity and your skill level. Beginners should expect to spend more time learning techniques and making mistakes before creating polished pieces.
Leather armor is more beginner-friendly and forgiving than metalwork, making it an ideal starting point for learning basic armor construction principles. Metalworking requires more physical strength, heat management, and safety awareness, but both are achievable with patience, proper instruction, and practice.
Leather armor is lighter, faster to make, requires less equipment, and is safer for beginners, making it ideal for learning fundamentals. Metal armor offers greater authenticity for historical recreation and durability, but demands specialized equipment, higher skill levels, and more time investment.
Yes, many armor makers successfully sell pieces at Renaissance fairs, online shops, and to historical reenactment communities. Starting small with custom commissions or online platforms like Etsy allows you to test demand and build a customer base before scaling production.