BoredomBusted — Find Your Next Favorite Thing To Do
Discover hobbies, activities, places, and ideas that spark joy. Whether you're looking for something creative, active, social, or relaxing, BoredomBusted helps you find your next favorite thing to do.
Browse our hobby guides, things-to-do collections, and place ideas to never be bored again.
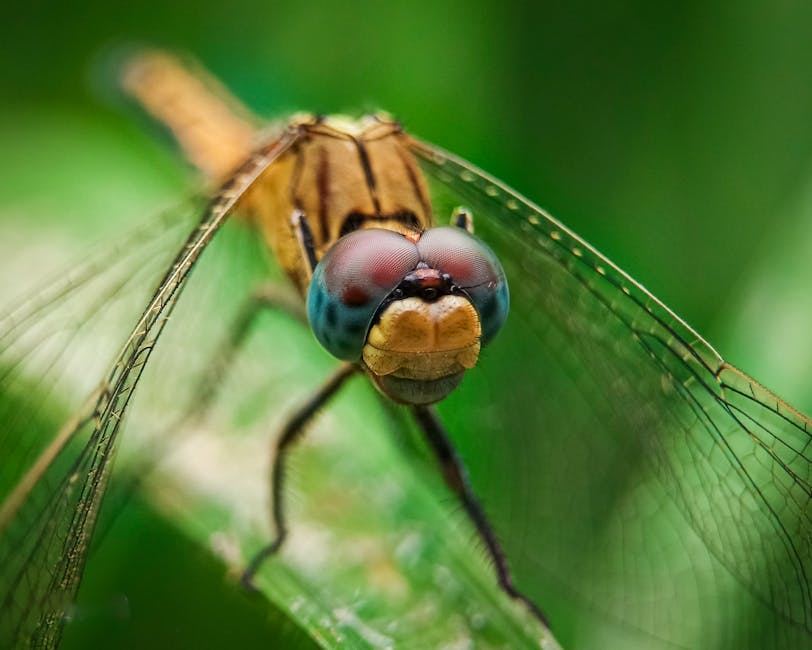
Macro photography isn't just about close-ups—it's a training ground for seeing the extraordinary in the mundane, turning everyday objects into visual masterpieces.
Learning macro photography as a beginner allows you to capture the intricate details of tiny subjects that often go unnoticed.
You're not just getting close; you reveal details invisible to the naked eye.
True macro needs special lenses that capture subjects at actual size, transforming small objects like beetles into alien landscapes.
In macro photography, hobbyists closely position their cameras to capture extreme close-ups of small subjects, like household items or garden flora, adjusting settings such as aperture and shutter speed while experimenting with lighting and composition to unveil intricate details and textures that are often overlooked.
Macro photography creates a flow state by demanding intense focus on minute details, allowing time to slip away as hobbyists engage in a hands-on process of experimentation and skill refinement, leading to immediate feedback and a sense of accomplishment from transforming mundane objects into visually stunning images.
You think macro photography is just taking close-up pictures of flowers. Point camera, get close, done – a niche thing people do in gardens on Sunday afternoons.
You're missing the hidden worlds that transform everyday objects into captivating art.
Macro photography shifts your focus from the obvious to the overlooked. A rusted bolt becomes an endless landscape. A soap bubble resembles an entire planet. Your kitchen counter suddenly feels like uncharted territory.
With macro, the frame's technical limits turn into your creative power. Depth of field narrows to mere millimeters. Every focus decision shapes the story you're telling. You're not just capturing an image, but defining what reality looks like in that moment.
Drop a dead moth on a piece of black cardstock and shoot it at 1:1 magnification. The result isn't a dead moth, but a museum artifact. Fur textures and wing patterns emerge that you never noticed before, no matter how familiar moths are to you.
The subject itself is secondary. The real challenge is discovering what makes it fascinating.
So, do you need pricey gear for this eye-opening experience? People who've invested in a fancy macro lens might not like the answer.
Macro photography might seem graceful in tutorials. But your first try is anything but.
Expect more blur and chaos than clarity at first. Your hands aren't steady, your focus waffles, and everything feels wrong.
Beginners are caught off guard by how easily movement ruins a shot. Even the smallest motion shifts the frame, and you reconsider your choices.
The challenge isn't really about gear or sight. It's that tiny vibrations, like your heartbeat, throw off everything at high magnification.
To improve your results, use fast shutter speeds. Go for 1/250s or faster, even with a tripod.The next step is understanding the mistakes that hold you back.
When to start: Early morning
Duration: 1 hr 30 min
Cost to try: $10
Success criteria: If you capture one sharp close-up frame of a tiny subject with the main details filling most of the image, do session 2.
Macro photography doesn't forgive excessive blur. At 1:1 magnification, f/2.8 traps your focus in millimeters instead of feet.
Shoot in the f/8 to f/16 range for better depth. Use focus stacking to achieve complete sharpness across your subject.
A minor wobble can look huge in macro shots. What's barely noticeable normally magnifies to ten-foot tremors in your images.
Use a focusing rail and a timed or remote shutter to avoid this. Physical contact during exposure causes more ruined shots than bad lighting.
Many beginners adjust the camera instead of the subject, which often leads to blurry shots.
Fix your camera in place and adjust your subject or body. Moving slightly back and forth is how you lock in the perfect focus.
Autofocus struggles with macro distances, often adjusting too much and missing the target focus plane entirely.
Switch to manual focus and estimate your distance. Subtly sway forward until the subject is sharply defined.
Just a breeze can blur your subject into nothingness. Wind is a silent enemy outdoors.
Shoot in calm conditions or shield with a reflector. It doubles as fill light and keeps gusts at bay.
Macro photography doesn't need special venues. Your backyard or kitchen table is enough.
Introduce yourself at a camera club meet. Mention you're new to macro photography; this sparks guidance from the community. You might even walk away with extension tubes to try out, valuable advice on lens choices, and recommended local shooting spots.
Extension tubes slide between your camera and lens, letting you get closer without affecting image quality. Ideal for those with good lenses who aren't ready to invest in macro glass. At $20–$80, they're the cheapest way to start.
True macro lenses offer 1:1 reproduction and can double as portrait lenses. Perfect for those serious about macro as a hobby. Prices range from $300–$600, with Tamron and Sigma providing alternatives to Canon or Nikon.
Focus stacking involves shooting several images at different focus points and merging them. Great for detailed photographers comfortable with post-processing. You'll need a tripod and static subjects, but no additional equipment.
Reverse a standard lens using a cheap adapter ring for macros. Perfect for those who want extreme magnification for under $15. But be prepared to work without autofocus.
Microscope adapters enable 10x–40x magnification by linking your camera to a microscope. Best for those prioritizing scientific exploration over artistic shots. Assemble a basic setup for $100–$200, but consider starting with extension tubes if new.
Astrophotography lives in the same world — different mechanics, similar appeal.
If the texture of this appeals to you, Landscape Photography is built on similar bones.
Some of the same instincts show up in Documentary Photography — worth a look if this clicked.
Chasing sharper lenses and better lighting won't solve blurry, flat macro shots. Gear isn't the issue.
The real breakthrough comes from mastering focal plane management.
This skill is about choosing which slice of your subject is in focus. Then angling your camera so that slice matters.
In true macro, your depth of field might be thinner than a human hair. Just a one-degree tilt can shift focus from an insect's eye to its antenna.
While beginners just point the lens, pros adjust the camera angle until the focus plane aligns with the part they want sharp.
Understanding your focal plane lets you use blur as a creative tool. Soft areas become intentional and add to your composition.
Miss this skill, and you'll keep stopping down to f/16 for sharpness, only to invite diffraction and lose image quality.
Commit to 6 sessions over 30 days— roughly one and a half per week. This balances giving the hobby a fair shot while avoiding burnout.
You keep finding excuses to go back.
Maybe you spent twenty minutes on a single dewdrop. Maybe you're already annoyed that your kit lens won't go close enough. This signals genuine fit, not just novelty. Start thinking about extension tubes before you touch anything else.
You finished all six sessions and feel basically nothing.
This usually means macro is satisfying in the moment but doesn't pull you forward. It might mean you need more movement, more spontaneity, or a subject that talks back. One extension probably won't change the read.
You were dreading it by session four.
Be honest about what specifically bothered you. If it was the stillness, the repetition, the physical awkwardness of shooting two inches from the ground, those don't get better. They're the job.
You're already crouching in the garden to look at something before you even have a camera in your hand. That instinct to get closer instead of stepping back shines through before people even know macro photography exists as a hobby. If you've caught yourself photographing frost on a window or the inside of a flower with your phone held embarrassingly close, that's the signal.
Not ready to pick a hobby yet? The boredom busters page has smaller things to try first.
At minimum, you'll need a macro lens (or close-focusing lens) and a camera body, but many beginners start with macro filters or extension tubes, which are much cheaper options. A tripod and external lighting (like a ring light or reflector) are also helpful for sharp, well-lit images. You don't need expensive gear to begin—a used camera body and macro lens can get you started affordably.
You can start with used equipment for $200–$500, or spend $800–$1,500 for quality new gear including a camera, macro lens, and basic lighting. Premium setups with specialized lenses and advanced lighting can exceed $2,000, but these aren't necessary for learning and enjoying the hobby. Begin with what you have and upgrade as your skills and budget allow.
The fundamentals are easy to learn, but mastering sharp focus and proper lighting takes practice since depth of field is extremely shallow at high magnification. Most beginners can capture recognizable macro shots within a few weeks with patience and experimentation. The learning curve is gentle if you start with easier subjects like flowers before moving to moving insects.
You can capture decent images within a few weeks, but developing a consistent eye for composition and lighting typically takes 2–3 months of regular practice. Becoming truly skilled at photographing difficult subjects like insects in flight may take 6–12 months. Progress depends on how often you shoot and how intentionally you study your results.
Anything small works—insects, flowers, water droplets, textures, plants, crystals, food, and even household items reveal stunning detail under magnification. The best macro subjects have interesting colors, patterns, or structures that become captivating when enlarged. Outdoor photographers often focus on nature, while others explore abstract textures or creative close-ups indoors.
Natural light works well and is free, but it's often unpredictable and harsh outdoors. Most serious macro photographers use artificial lighting like ring lights or led panels to control brightness and reduce harsh shadows. Many combine natural and artificial light or use reflectors to redirect sunlight for more flattering results.